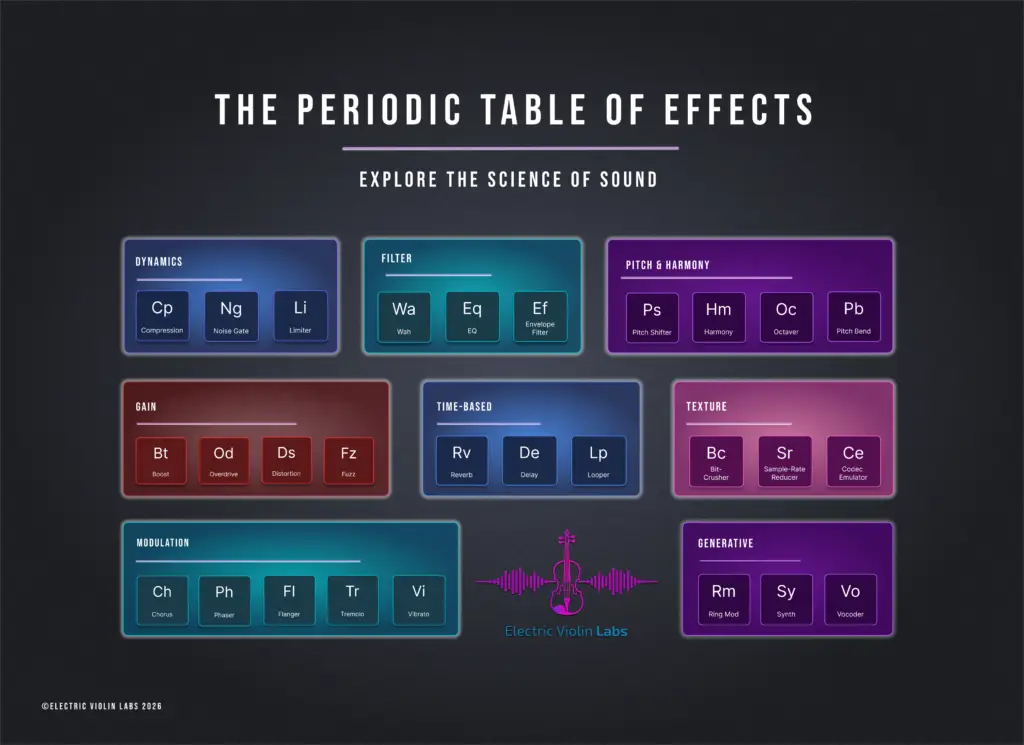
If you’ve been following our journey through the Periodic Table of Effects, you know we like to think of effects as colors on an artist’s palette. We recently dove into the Dynamics Family, looking at how compressors can act like an “invisible bow hand.” Today, we’re moving into one of the most expressive, fun, and classic effects: the Filter Family.
The most popular filter effect is the legendary Wah-Wah pedal. For many string players, the wah is the gateway into the world of pedals (it was one of the first pedals I purchased!). The Wah-Wah is a tactile and vocal pedal that changes the way you think about articulation. An envelope filter does what a wah does, but automagically! Let’s explore these effects and get to know the Filter Family.
What Is the Filter Family?
In the world of audio, a filter is exactly what it sounds like: it lets some things through while blocking others. Audio filters deal with frequencies; they let some tones through while blocking others.
Imagine that your violin tone is an object that can be sculpted. The filter is the tool to shape it, like a chisel on a block of stone. In your block of tone, you can carve away the high overtone frequencies to make your sound warmer, or you can carve out the middle of the block to make your tone sound hollow and spacey.
Low and high pass filters act in this way, but in the land of effects pedals, those filters tend to be included alongside a specific effect. The MXR Chorus is one example of low and high pass filters being included on a pedal.
As far as individual effects pedals are concerned, Wah pedals and envelope filters (sometimes called ‘auto wah’ effects) are the main effects we’ll review today. Wah pedals are manual, foot-controlled filters that sweep through the frequency spectrum. Envelope filters are dynamic filters that react automatically to how hard you play, rather than the physical movement of your foot on a pedal.
The Wah-Wah Pedal: A Sweepable Filter
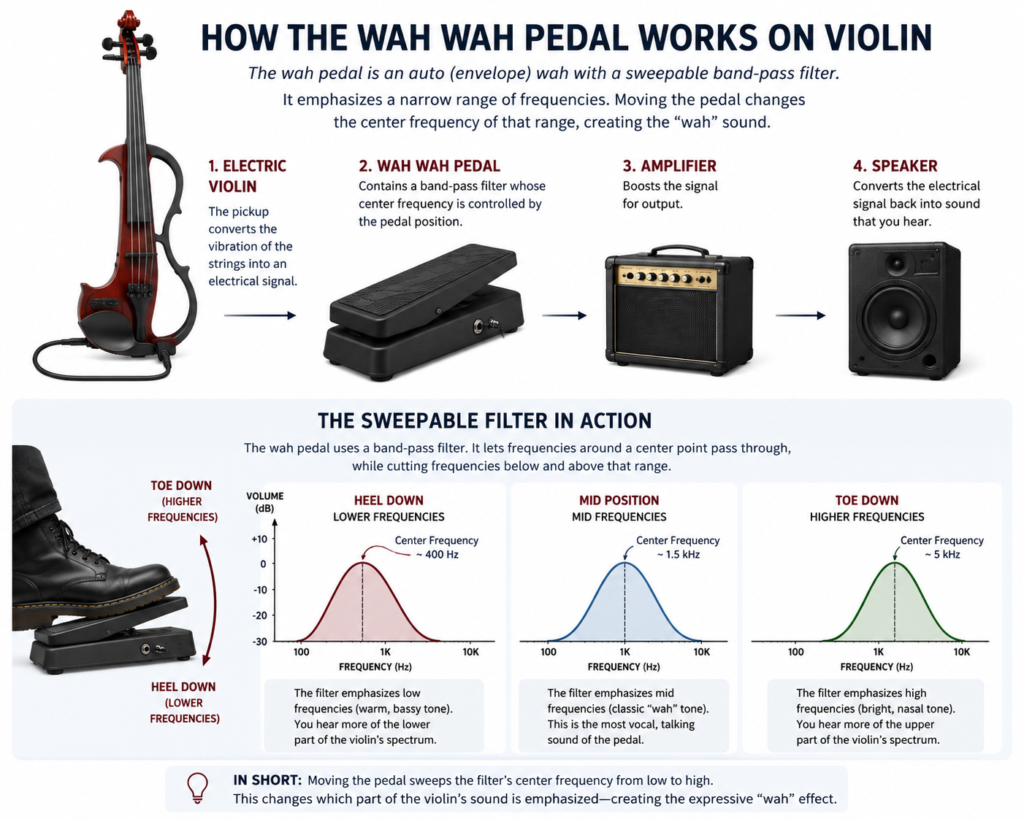
The Wah-Wah pedal is essentially a sweepable band-pass filter. Band-pass means that the Wah effect highlights a specific area or band of frequencies, and reduces the other frequencies. Sweepable means you use your foot to move that highlighted band around the full frequency spectrum.
A Wah-Wah pedal looks like a gas pedal on a vehicle. When your heel is down, the filter is sitting in the low frequencies (around 300–400 Hz), giving you a dark, underwater sound. As you push your toe down, the highlighted band moves toward the treble range (up to around 2 kHz), and the tones that are highlighted are brighter and sharper to the ear. The movement between the lower and higher frequency is what creates the “wah” sound, which mimics the human voice moving from an “ooh” sound to an “aah” sound.
Envelope Filters: Wah for Your Bow Hand
An envelope filter is a dynamic effect that modifies the frequency content of your signal based on how hard you play. Inside the pedal, an envelope follower tracks the amplitude (volume) of your input and uses that information to control a resonant filter, typically a low‑pass or band‑pass filter.
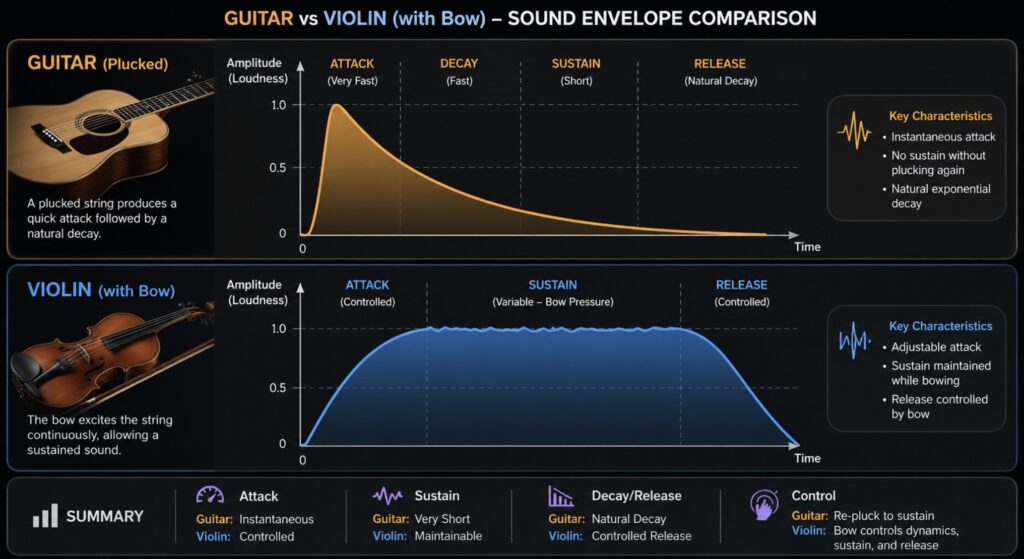
There’s actually a lot going on in the envelope filter. It tracks the envelope, which is the attack, sustain, decay, and release of your sound. I like to think of the envelope as the journey of a single sound from start to finish. Here’s what’s happening in each part of the journey:
Attack: When you bow or pluck a note, the initial transient triggers the filter to open up, allowing more high frequencies through.
Sustain, Decay, Release: After the sustained bow, as the note decreases in volume, the filter gradually closes, creating that characteristic wah sweep.
Filter types: Many envelope filters let you choose low‑pass (smooth, rounded top), band‑pass (vocal sounding), or high‑pass (thin, edgy) responses.
The result is an automatic wah-like effect that responds to your playing dynamics. Play harder and the sound pushes open; play softer and it relaxes back into a darker tone. For electric violin, this means your bowing, accents, and articulation directly shape how the filter moves across all the frequencies that make up your sound (the base tone and overtones).

Wah vs. Envelope Filter for Violin
Both wah and envelope filters live in the same family, but they feel very different under the hands of a string player. Which filter you want to use will depend on your musical goals, gear needs, and coordination.
Wah:
– Foot-driven.
– Great for deliberate, rhythmic sweeps and talking solos.
– Demands coordination between bow and foot, similar to playing with a volume pedal.
Envelope filter:
– Bow-driven.
– Great for funky comping, auto‑wah textures, and synth-like swells.
– Responds to pressure and speed of the bow and the resulting dynamics.
Envelope Filter Specifics
Envelope filters have settings you can adjust. Most have the following settings:
Sensitivity (sometimes called Drive or Gain): This is how easily the filter opens in response to your attack. Violins may need a higher sensitivity setting than guitars because bowed attacks can be softer than picked ones. Experiment with the ways you will play using the envelope filter to find the right setting for your playing style.
Peak/Resonance: This refers to how much the filter emphasizes its cutoff frequency. Higher settings have a more pronounced edge, while lower settings will sound smoother.
Filter type/mode: What kind of a filter you are using. Low‑pass for smooth sweeps, band‑pass for vocal sounds, high‑pass for thinner, edgy tones.
Direction (Up/Down): This indicates what direction the filter will move when you play. The filter opens upward into brighter territory and frequencies, or downward into lower frequencies darker tones.
Bowing vs. Pizzicato Dynamics
Envelope filters were originally designed for the sharp attack of picked guitar strings. Since we have options between bow or pizzicato, we need to consider how these will trigger the filter.
Pizzicato, staccato bowing, and chopping will trigger the filter more dramatically, because they are more similar to the Legato, sustained bowing will produce gentler, slower sweeps and trigger the filter less aggressively.
Start with the sensitivity lower than you think, then raise it until your normal mezzo-forte produces a satisfying sweep. From there, experiment with different bow pressures and accents to see how the filter responds to your playing.
Where Filters Go in Your Signal Chain
In general, people tend to place their filter effects early in their signal chain, before gain or modulation effects. However, where every effect goes is ultimately up to you and the sound you are trying to achieve.
Because violins have higher frequencies and brighter response (at least piezos) as well as multiple attack modes, the filters may act a bit differently than you see on tutorial videos for the pedals you have purchased. Don’t be afraid to try multiple signal-chain layouts and settings to hear which feels more expressive for your style. Experimentation is key! Document different settings with quick phone videos or notes so you can revisit your experiments and settings that you like.
Bringing Filters into the Classroom and Studio
The Filter Family is one of the easiest ways to start experimenting with effects, turning technical exercises like scales or bow-pressure into explorations of sound science. Students working on bow speed, pressure, and placement can hear an exaggerated response to their bow movement, which may help them better understand the bow variables. This also opens the door for more discussions about frequency, range, and dynamics. Plus, it’s fun!
Here are some experiments to try yourself or with your students.
Experiment 1: The Full Sweep Scale
Play a one-octave G major scale, start with whole notes.
Wah: For every note, do one full, slow sweep of the pedal (heel-to-toe), focusing on making the vowel change happen exactly when you change your bow.
Envelope: For every note, adjust the pressure of your bow as you play. Start with low pressure, reach the highest pressure at the top of beat 3, and then pull back to lowest pressure by the end of beat 4.
Experiment 2: The Double
Play the same scale exercise as above, but for every note, rock the pedal twice (toe-heel-toe-heel). On the Envelope filter, try adjusting where you add and remove pressure during your bowing.
Experiment 3: Park It
Sometimes, you don’t even need to move the pedal. Find a foot-pedal position or envelope filter setting that you are curious about, keep the setting solid (so, don’t move your foot if you are working on the wah pedal), and then play your scale exercise. This allows you to generate interesting lo-fi tones and other interesting sounds.
Final Thoughts
The filter family effects are tools for expression that bridge the gap between the classical tradition of tonal control and the modern world of sound design. Envelope filters extend that bridge by letting your bow technique (pressure, speed, and amount) drive the filter automatically, opening up everything from vintage funk to futuristic sounds, all depending on how you play.
Ready to dive deeper into the world of electric strings? Check out our Get Started Guide or join our community of educators and musicians in the Electric Violin Labs Studio.