Author: drjess_labs

  • The Ultimate Guide to Electric Violin Ergonomics: Everything You Need to Succeed

    Switching from a traditional acoustic violin to an electric one is an exhilarating leap into a world of infinite sonic possibilities: distortion, delay, looping, and the ability to finally be heard over a drum kit! But once the initial excitement of the volume knob wears off, many players hit a literal wall: physical discomfort.

    The ergonomics of the electric violin are more varied than those of the acoustic violin world. If you try to force your old setup onto a new, non-traditional instrument body, you might be risking more than just your comfort. Long-term improper use can cause real physical harm. Music education isn’t just about the notes, it’s about how we inhabit our bodies while playing them.

    A Personal Perspective: Playing with Purpose

    To understand why I’m so passionate about this, you have to understand my baseline. As a violinist living with ankylosing spondylitis (a type of inflammatory arthritis that spreads throughout the joints), I can’t just tough things out and hope they work. For me, awareness of my setup and physical health is a requirement for my livelihood.

    When I talk about ergonomics, I’m coming from a place of deep respect for the body’s signals. In our culture of “no pain, no gain,” we often teach students to ignore their discomfort in favor of proper technique. While most of us have experienced discomfort due to improper setup or technique, we are not professional doctors or physical therapists. I’m here to tell you that your body is the smartest person in the room. If something hurts, that’s your body giving you data. Your job is to listen, analyze, adjust, and know when to get professional help.

    Geometry Problems: Why Your Preferred Rests Might Not Work With Your Electric

    On an acoustic violin, dimensions are standardized. A 4/4 violin has a predictable width and thickness. The world of chin rests and shoulder rests is built for those particular dimensions.

    Electric violins throw that standard out the window. Some have skeletal frames with almost no body mass and thin or awkwardly curved lower bouts. Others are like solid-body guitars, carved from blocks of wood that are significantly thicker (or thinner) than a traditional instrument, with weight balances that shift based on the shape and material of instrument.

    Thickness and Width Variations

    When the electric instrument is thinner than an acoustic, your traditional shoulder rest might not be able to “grip” the edges, or it might sit so low that you find yourself raising your shoulder or curving your neck to reach the chin rest. Conversely, a thick-bodied electric violin combined with a high shoulder rest can make you feel like you’re trying to reach your neck over a brick wall.  The shoulder rest may not be usable.

    Proprietary Rests and Special Needs

    Some of the most popular electric violins use proprietary mounting systems; for example, the NS series have chin rests as part of the instrument design; the Yamaha YEV series requires a center mounted rest. This means you can’t just swap out the factory chin rest for your favorite Berber or Guarneri model. For players with special physical needs, whether that’s a long neck, a unique jawline shape, or a condition like mine, this lack of modularity can be a dealbreaker.

    Before you buy, check if the instrument allows for standard hardware or if you are locked into their design. If you are locked in, ensure that design actually works for your frame by going to a shop to try an instrument out, or doing mail-order trials and returns.

    A teacher demonstrates an electric violin and effects processor to a group of engaged students

    The Science of Movement: Body Mapping and Beyond

    We cannot talk about ergonomics without talking about Movement Science. One of the most transformative frameworks for string players is Body Mapping, pioneered by experts like violinist Jennifer Johnson (author of What Every Musician Needs to Know About the Body).

    Body Mapping is the process of correcting and refining your mental map of your own biological structure. If you think your arm moves from the shoulder socket but completely ignore the role of the sternoclavicular joint (where your collarbone meets your breastbone) in that movement, you will experience tension in your body. I participated in a master class by Jennifer three years ago, and her observations helped me form ongoing awareness of my shoulders and upper back. I made some seemingly small changes to my posture that dramatically improved my comfort.

    Holographic skeletal overlay showing neutral spine and body mapping for electric violin ergonomics.

    Exploring Your Options: Beyond the Standard Setup

    If the traditional chin-and-shoulder-rest combo isn’t working for your electric setup, don’t worry. There are alternatives. The electric world has more options for non-standard setups than the orchestral world.

    Traditional, Adjusted

    Sometimes, all you need is an adapter or a specialized rest for your instrument. Several companies now make extra-tall chin rest feet or rests that offer more lateral support. Fully-custom chin rest options are also available, through companies that do fittings and measurement for the player and instrument.

    Harness Systems: The Viper and More

    For many, the weight of a solid-body electric violin is a hurdle. This is where harness systems come in.

    • The Wood Violins Viper: This is perhaps the most famous harness-based instrument. It uses a chest support system that completely removes the weight from your neck and chin. It allows for hands-free playing, which is a game-changer for singer-songwriters or those with neck injuries. I purchased a Viper for this reason, and am quite happy with it.
    • NS Design Balanced Shoulder Rest: NS Design offers a unique system that balances the instrument against your torso using a flexible, padded structure. It allows for a full range of motion without the “clamping” action of the jaw. I have it, and it can be a bit difficult to adjust, but you can achieve a more balanced
    • Balanced Systems: There are various other straps and counter-balance systems designed to distribute the weight of the instrument across the shoulders and back rather than centering it on the cervical spine.

    If you struggle with chronic pain, exploring a harness system might be helpful for extending your playing time and increasing comfort.

    Integrating Technology and Comfort

    Ergonomics is about how you interact with your entire setup. If you are constantly leaning over to tweak a pedal or looking down at a laptop screen to check your levels, you are creating “text neck” and spinal strain.

    A student practices violin in a classroom equipped with audio interfaces and effects pedals

    When setting up your practice space or stage rig:

    • Raise your interfaces: Put your laptop or mixer at eye level.
    • Use a tablet stand: Reading music from a tablet is great, but only if the tablet is positioned so you don’t have to tilt your head down. Using a tablet to manage your rig?
    • Cable Management: A heavy instrument cable pulling on the endpin of your violin adds drag weight. Use a wireless system, or clip your cable to your belt to eliminate that downward pull. I cannot recommend this one enough, as I find the cable causes a lack of balance that increases my tension while I’m playing.

    How to Get Started with a Healthier Setup

    If you’re feeling overwhelmed, start small. You don’t need to buy a $4,000 Viper tomorrow to find relief (I’m guessing the folks over at Wood wouldn’t mind if you did though)

    1. Audit your current setup: Spend 10 minutes playing and then stop. Where do you feel tension, tightness, or irritation? Is it the base of your thumb? Your left shoulder? The right side of your neck? What parts of your setup are constantly taking your attention?
    2. Consult the experts: Look for experts in the fields of Body Mapping, Alexander Technique, the Paul Rolland method, or physical or sports therapists who specialize in working with instrumentalists.
    3. Education is key: Consider professional development that includes awareness of movement principles as part of the curriculum.

    You Deserve to Play Pain-Free

    At the end of the day, the electric violin is a tool for expression. Whether you are a student just starting out or a seasoned pro, your physical comfort is the foundation upon which your music is built.

    By understanding the unique geometry of electric instruments, embracing movement science like Body Mapping, and being willing to experiment with harnesses or proprietary rests, you can build a setup that supports you.

    Remember: Listen to your body, reject the “pain is gain” mentality, and don’t be afraid to innovate. Your spine will thank you, and your music will reflect the freedom that comes with a truly ergonomic setup.

    Want to dive deeper into the world of electric strings? Visit our About page to learn more about our mission or contact us to bring a workshop to your school. Let’s build a more comfortable, more creative future for string players together.

  • The Periodic Table of Effects: A New Way to Understand Electric Violin Sound

    If I asked you right now, right this second, to group every pedal you own by what it actually does to your signal, could you do it?

    Most electric violinists I talk to can’t. But that isn’t a failing of ours. It’s a gap in how sound design knowledge is passed down to string players. For decades, we’ve been on our own to figure out how effects pedals work with our instruments.

    Until now.

    At Electric Violin Labs, we believe in systematic, ground-up learning. Whether you are exploring electric violin as a beginner or you’re a seasoned pro looking to refine your rig, you need a framework that respects the unique physics of bowed string  instruments. 

    Welcome to the Periodic Table of Effects for Electric Violin.

    The Problem: We Don’t Know What We Don’t Know

    With electric violins having been available for over fifty years, you’d think the process of buying gear would be less chaotic. Unfortunately, that’s not the case. You hear a cool reverb on a recording, so you buy that reverb. Someone mentions that compression is important for violinists, so you snag a compressor. You end up with a pile of gear that you don’t fully understand (ask me how I know).

    The real issue is education. Pedal tutorials say, “Put your time-based effects last,” but if you don’t know which of your pedals are time-based, that instruction isn’t helpful. Plus, bowed string instruments behave differently with all of the effects. Our piezo pickups have massive transient spikes that guitars don’t. Our frequency range is higher and broader. I was thinking about these problems while putting audio foam on the Studio ceiling in December, and it occurred to me – I needed a framework for my own understanding. And I’m certain I’m not alone.


    The Effects Table

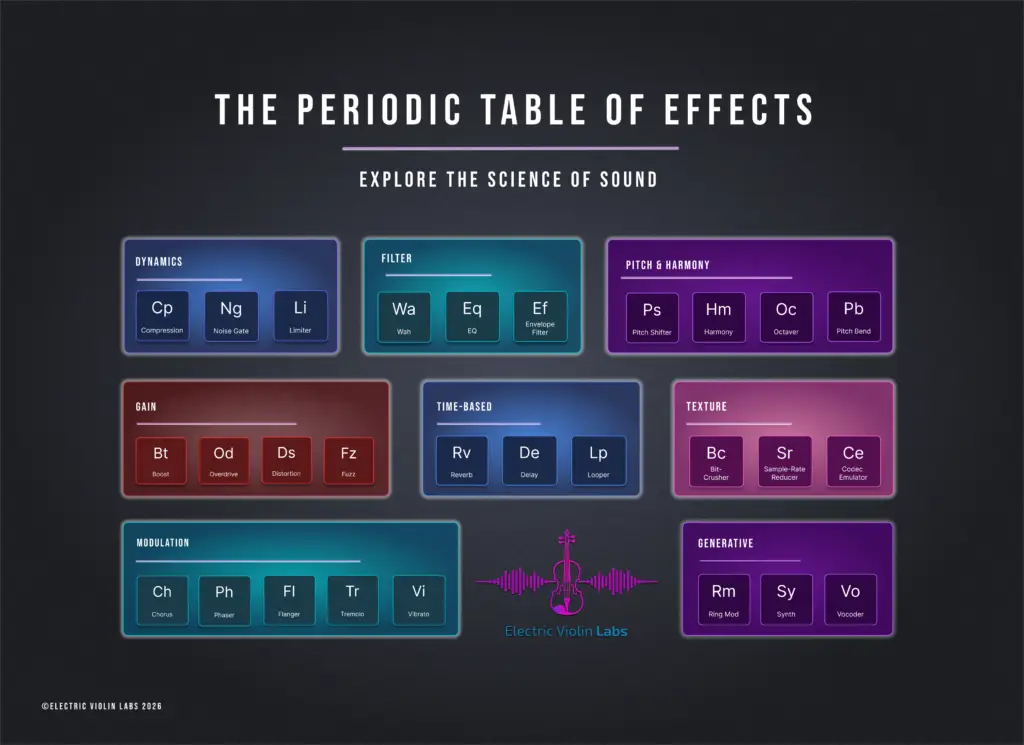
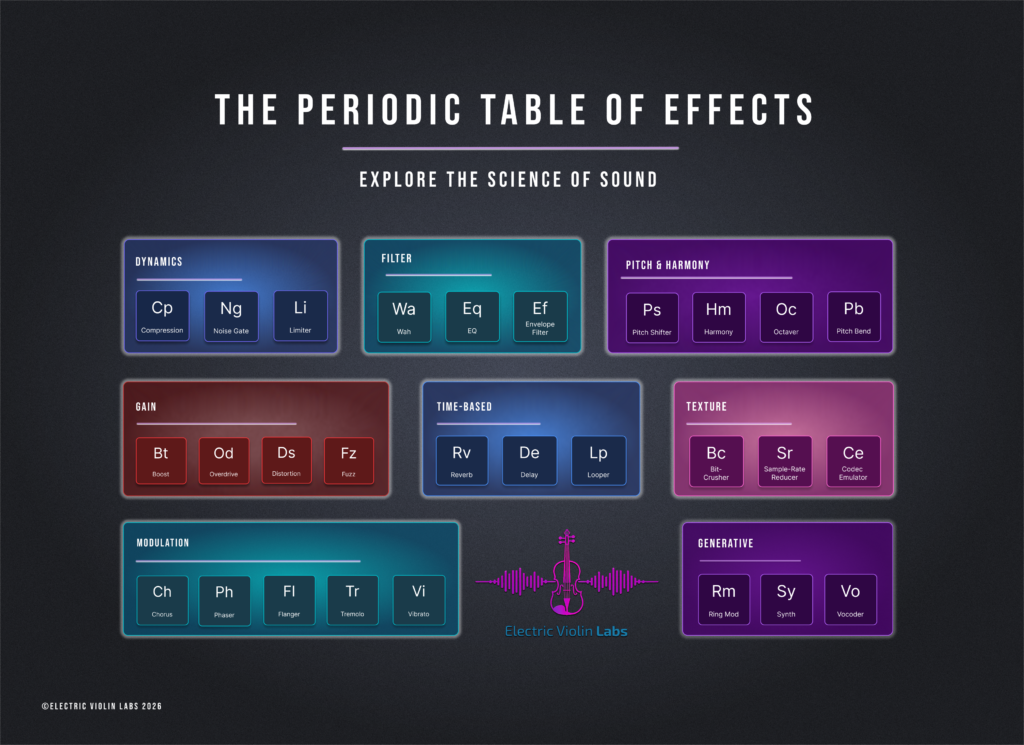
    Inspired by the periodic table in chemistry, the Effects Table organizes every pedal into eight effects families/classes, based on how the signal is manipulated. The good news about effects is that pretty much every effect made belongs to at least one of these eight families. Once you understand each family, you understand how each effect is working with your signal, and where it sits in relation to the other families. Here’s a brief overview of the families.

    1. Dynamics (Cp, Ng, Li)

    Includes: Compression, Noise Gate, & Limiter

    Dynamics is about controlling the amplitude (volume) of your signal before it hits the rest of your chain. 

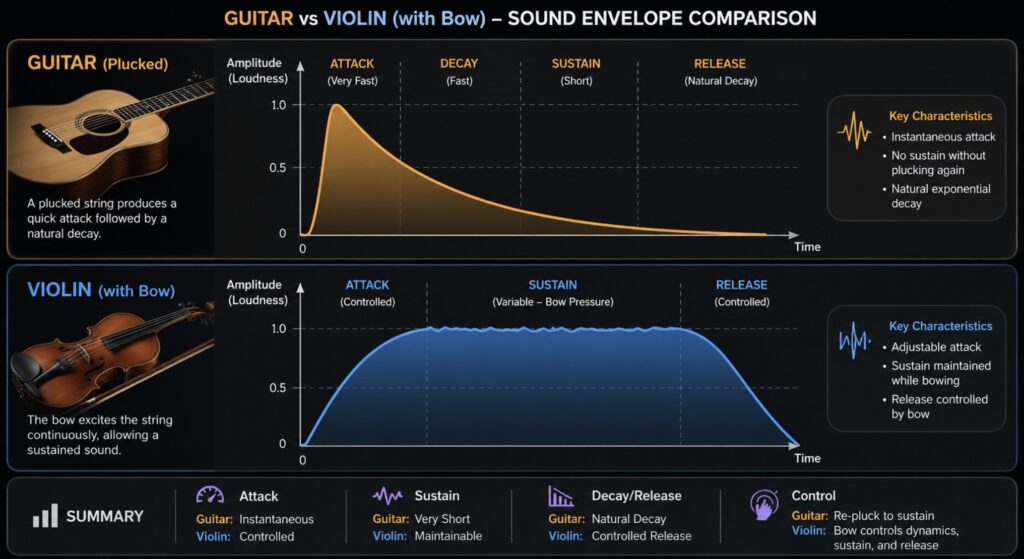
    • Violin Context: Piezo pickups are notorious for sharp, quacky spikes when the bow attacks.  A compressor catches those extremes and lifts the quietest notes, creating a stable, professional sound.
    • The Limiter: This acts as a hard ceiling, preventing unexpected aggressive sounds or accents from clipping your interface or blowing a speaker.

    2. Filter (Wa, Eq, Ef)

    Includes: Wah, EQ, & Envelope Filter

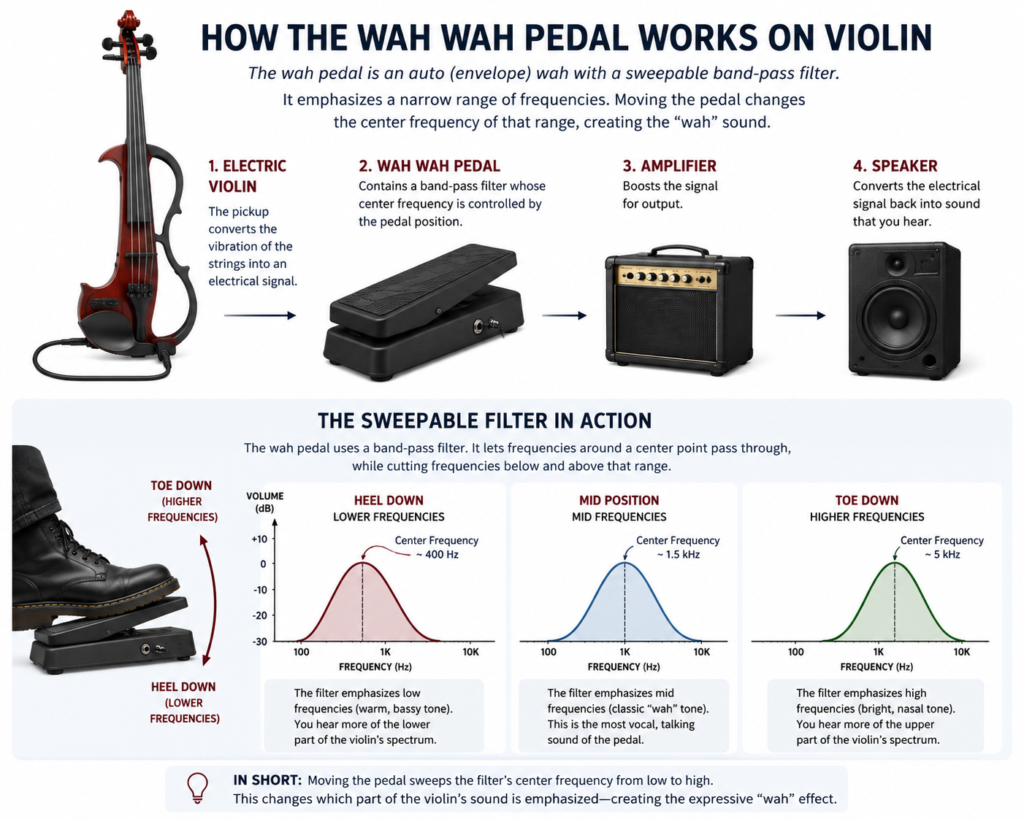
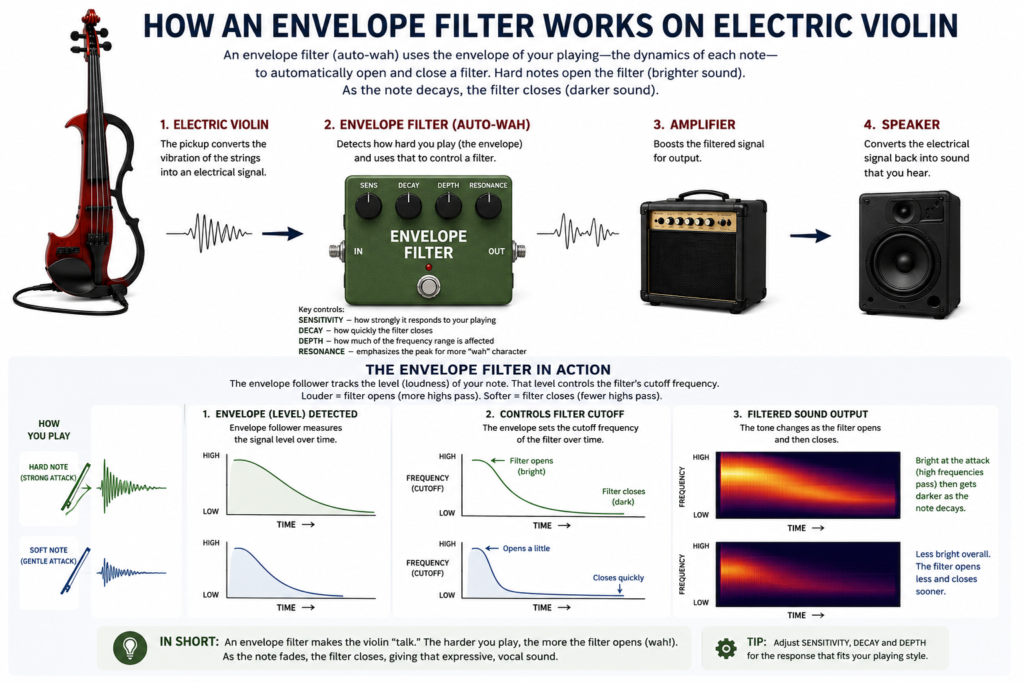
    Filters decide which frequencies stay and which ones go.

    • EQ (a must for piezos): A good EQ is an important tool. It allows you to roll off the harsh high-end fizz of a piezo and add warmth in the low-mids.

    3. Gain (Bt, Od, Ds, Fz)

    Includes: Boost, Overdrive, Distortion, & Fuzz

    Gain is intentional distortion. It adds harmonics by clipping the signal.

    • The gotcha for violinists: Gain amplifies everything, including tone issues, which can be a genuine nightmare in overdrive, distortion, and fuzz. 
    • The fix:  EQ and gain stage your signal first (the Filter family). Then gain becomes a transformative tool that makes the violin sound like a completely new lead instrument.

    4. Modulation (Ch, Ph, Fl, Tr, Vi)

    Includes: Chorus, Phaser, Flanger, Tremolo, & Vibrato

    Modulation adds movement and “shimmer” by creating a wobbling effect.

    • Violin note: Many string players use physical vibrato. If you use a Vibrato pedal at a speed close to your physical vibrato, it can cause you to sound accidentally out of tune or out of sync with yourself. Calibration is key here; the pedal should complement your bow and your physical vibrato, not fight it.

    5. Time-Based (Rv, De, Lp)

    Includes: Reverb, Delay, & Looper

    These effects store your signal and play it back. This creates the illusion of space (Reverb) or rhythmic echoes (Delay) or even a duet partner (looper).

    • Chain Position: These almost always go at the very end. You want to add “the room” to your finished tone, rather than trying to distort or filter the “room” sound later.
    • Rules are made to be broken, so if you’re going for a distorted room sound, you do you, and make the wildest chain. Just make sure you understand why so you can get your fave sounds, repeatedly.

    6. Pitch & Harmony (Ps, Hm, Oc, Pb)

    Includes: Pitch Shifter, Harmonizer, Octaver, & Pitch Bend

    This family adds notes you aren’t physically playing.

    • Fun violin move: A sub-octave (Octaver) can instantly turn your violin into a cello. For solo performers, this is how you fill a room with a full frequency spectrum without needing a backing band. Harmonizers thicken texture.

    7. Texture (Bc, Sr, Ce)

    Includes: Bit-Crusher, Sample-Rate Reducer, & Codec Emulator

    Texture effects shape the surface of your sound through deliberate signal degradation.

    They reduce resolution to create lo-fi grit or pixelated artifacts. For experimental sound design, these are your go-to tools for making a violin sound like an old video game or a corrupted MP3. I just heard a pedal demo’d by Josh of JHS that emulates anime characters. 

    8. Generative (Rm, Sy, Vo)

    Includes: Ring Modulator, Synth, & Vocoder

    Generative effects create new signal content that wasn’t in your original playing. A Synth pedal doesn’t just modify your violin’s sound; it uses your pitch to trigger an entirely new waveform (like a square or sawtooth wave). Your violin becomes a synth controller, opening up sounds far beyond what is normally possible.

    How to Use the Table in Your Practice

    You can use this framework in any way you find useful. Here are some recommendations:

    1. Sort your gear stash: Take every pedal you own and assign it to one of the families. If you have a pedal and you don’t know what it does, engage it and compare its behavior to the family descriptions above. Or, visit your friend Claude or YouTube to see what it does and how it’s made.  You’ll quickly see where your gaps and preferences (I.e., I don’t need another modulation pedal. Or another synth pedal. But I want one!)
    2. Order Your Chain: While there are no laws in art, there is a logical default pedal order that is generally considered for starting:
      • Dynamics → Filter → Pitch → Gain → Modulation → Time-Based.
      • Texture and Generative usually live near the front or middle, depending on how weird you want things to get. Knowledge of the effects families can help you brainstorm new signal chain combinations and behaviors.
    3. Diagnose Problems: Use knowledge of the families to troubleshoot your tone. You’ll diagnose issues in your signal chain more easily once you learn the tonal tendencies and characteristics of pedal families.
    4. Hear Sound Differently: With a hierarchy of effects classes, you begin to learn how each one behaves. Once you do, you start to hear music differently, and not just violin.

    Elevating Your Sound Design

    Understanding your pedals in this way enhances your ability to be intentional about sound design and tone. I think of it as the compliment to my ear – what sounds good to me is something I can now investigate, iterate, and repeat. 

    If you’re ready to stop guessing and start building your signature sound, we have two resources for you right now:

    • Download the Poster: We’ve turned this framework into a high-resolution Free Resource. Print it, hang it in your studio, reference it often.
    • YouTube Videos: We’ll post videos each week to introduce the families and the specifics of bowed strings in these families.
    • Join the Electric Violin Labs Studio: I’m running deep-dive classes on this framework. We go into the specific “violin-only” rules for each family. Live sessions will be streamed for studio members, with playbacks available, as well as open labs to get feedback from me and your peers.

    Whether you’re just starting your journey or expanding the possible in string education, remember: the gear is just the tool. You are the architect.


  • Riding The Third Wave: Expanding the Possible in String Education

    Hey there, fellow teachers!

    If you’ve been in the string world for a minute, you know that we are standing at a pretty incredible crossroads. We’ve all felt that specific kind of tension in the classroom, the one where we’re trying to teach a beautiful piece of string orchestra literature while our students are quietly hum-singing the latest viral track they heard on a gaming stream, trying to see if they can figure it out by ear or find the sheet music online.

    For a long time, the way we do things in music education has felt set in stone. Right now, though, we are witnessing the rise of what I like to think of as the Third Wave of string education, and honestly, it’s the most exciting time to be a string player!

    At Electric Violin Labs, we spend a lot of time thinking about how to bridge the gap between important elements of traditional string education and the educational and engaging elements of modern and popular music. Let’s take a walk through where we’ve been and where we’re going in the Third Wave of string education.

    The First Wave: The Foundation of the Craft

    We all know the First Wave. This is the bedrock of our work. It’s the traditional classical pedagogy that most of us grew up with. Think Suzuki, Galamian, Schradieck, and the heavy focus on notation, orchestral standards, and correct posture and technique.

    The First Wave is beautiful because it gives us a common language. It’s about discipline, tone production, and the mastery of an acoustic instrument. Without the First Wave, we wouldn’t have the technical facility to do anything else. But, as many of us have seen in our own programs, the First Wave can sometimes feel like a closed loop.

    If a student doesn’t see themselves as a classical musician, they often feel like there’s no place for them in the orchestra room once they hit high school.

    The Second Wave: The Eclectic String Movement

    Then came the Second Wave, the Eclectic String Movement. This was the big opening of the gates. Twenty or thirty years ago, we started seeing more jazz, rock, fiddle, and mariachi styles entering the curriculum.

    This is when I entered the music teaching profession, and it was exciting!  At music education conferences, we started talking about improvisation, playing by ear, and exploring multiculturalism. Icons in our field pushed the boundaries, showing us that a violin can be a lead guitar or a rhythmic engine in a bluegrass band.

    This was a massive step forward for student engagement. It helped us make strings visible outside of classical music. Our students could see their musical skills on display in a variety of environments.

    But even in the Second Wave, we were still mostly focused on the style of music rather than the tools used to create it. We played rock and jazz songs on acoustic instruments. It was a bridge to the world our students inhabited, but the digital r/evolution pulled our students into an entirely new space.

    The Third Wave: Technology and Digital Integration

    This brings us to where we are now: The Third Wave. Standing on the Shoulders of Giants

    Before we go any further, I want to say this clearly. The Third Wave doesn’t replace what came before it. It exists because the first two waves gave us the foundation and the courage to expand. Our pedagogical foundations and explorations of multiple genres of music will continue to grow and expand.

    If anything, technology and digital integration is the next logical step for young musicians, one that helps today’s students stay connected to strings in a world that’s already digital.

    We have the First Wave to thank for our pedagogical roots. So much of what we still teach every day traces back to innovators like Shinichi Suzuki (through the Suzuki Association of the Americas) and Paul Rolland (and the work carried forward through the Paul Rolland String Residency). They gave string education practical, repeatable tools that will always matter: setup, physical integration, sequencing skills, and the belief that every child can learn.

    If the first wave is our foundation, the Second Wave is our creative hall pass. This leap came from pioneers who refused to keep the violin in a single lane. Mark Wood and his “Electrify Your Strings” program, along with Christian Howes and his Creative Strings Academy, have helped normalize the idea that violin belongs wherever music lives. They didn’t just add “fun” repertoire to string education. They’ve changed what students envisioned was possible with the instrument.

    (Personal note: I actually studied privately with Chris for a year, and I’m a member of Creative Strings Academy. Through Creative Strings Academy, Chris continues to be both a mentor and business coach. It was through that work I found the confidence and the vision to start Electric Violin Labs. That’s community over competition in real life, and Chris is a massive champion to many string educators this way).

    The Third Wave builds on all this deep work. We keep the technique, the musicianship, and the stylistic freedom. We add the tools (electric instruments, pedals, DAWs, looping, collaboration) that extend musical creativity into digital, collaborative spaces.

    The Third Wave is about musicianship THROUGH technology. The instrument is a gateway to, and mediator of infinite sonic possibilities. This is where Electric Violin Labs lives. We believe that integrating technology isn’t just a “fun extra” for a Friday afternoon. It’s the key to keeping some kids engaged in string programs during high school and participating in music creation throughout their adult lives

    When a student learns how to use a loop pedal or record themselves into a DAW like BandLab or Soundtrap, they go beyond performing somebody else’s music into the worlds of producer, creator, engineer, and designer.

    Why the Third Wave Matters for Student Retention

    Let’s get real for a second. We’ve all seen the middle school drop-off. Kids start playing in 4th or 5th grade with excitement, but by the time they get to 9th grade, the allure of sports, gaming, or social pressure starts to pull them away from the commitment required to grow their skills.

    Sometimes, they quit because they don’t see how the violin fits into their identity. They listen to lo-fi beats, electronic dance music, or heavy metal, and they don’t hear a violin in those spaces (even though it’s often there, hidden under layers of production!). Even when they do hear it, they don’t know how to engage with their instrument to make the same kinds of music.

    By introducing Third Wave concepts, we show our students that their instrument is relevant to the music they love and the way that music is created. When we show a student how to use a distortion pedal to get a “crunchy” rock sound, or how to use a delay pedal to create ambient soundscapes, we’re speaking their language. We’re giving them a reason to keep that case open and extending the range of what’s possible.

    If you’re looking for a way to bring electric strings, music recording, and music production into your classroom, checking out our for schools page is a great place to start. We love helping teachers figure out how to make this work without panicking over technical glitches or budget shortfalls.

    “But I’m NOT a Tech Person”

    I hear this a lot from fellow teachers: “Jess, I can barely get my Zoom to work. I don’t even know how to plug in an amp. How am I going to teach this?”

    Take a deep breath. I promise, you don’t need to be a sound engineer to start. You just need to be curious.

    One of my favorite “bridge” pieces of gear is something like the Boss ME-50 (or its modern equivalent, the ME-80/90). Why? Because it’s tactile, with knobs you can actually turn. It’s not a confusing menu on a screen; it’s a physical board that shows you exactly what it’s doing to your sound. It’s extremely durable, widely available used for a low price, and contains all of the major components necessary to understand electric effects on string instruments.

    For educators who are nervous about introducing electric strings, a multi-effects pedal like the Boss ME-50 is a game-changer. You plug in, you turn a knob that says “Delay,” and suddenly the room is filled with echoing notes. The look on a student’s face when they hear that for the first time is magical (and sometimes pretty hilarious – they are generally pretty surprised!).

    From there, you can start exploring things like:
    Recording: Using a simple interface to get sound into a computer.
    DAWs: Using platforms like Soundtrap for collaborative songwriting.
    Electric Instruments: Transitioning from an acoustic with a pickup to a dedicated electric violin for high-volume environments.
    Practical Steps to Ride the Wave
    If you’re ready to start but aren’t sure where to jump in, here are a few low-stakes ways to bring the Third Wave into your studio or classroom:
    The “Groove” Session: Have students improvise over a digital backing track. Use something modern: a hip-hop beat or a synth-wave track. Let them explore what “fits” by ear.
    The Effects Corner: If you can get your hands on one pedal (even a cheap one!), set up a station where students can try it out for five minutes after they finish their scales.
    Digital Composition: Encourage students to use tools like Sibelius or Noteflight to write their own 8-bar melodies. Hearing the playback immediately is a massive confidence booster. Or, have students improvise and record into a DAW using notes from a specific scale, a melodic idea from a piece you’re working on, or another constraint that sparks musical creativity.
    Explore Resources: You don’t have to reinvent the wheel. We have a get started guide and a bunch of free resources specifically designed to help you navigate this transition.
    The Global Stage
    One of the most powerful aspects of the Third Wave is collaboration. In the old days, you played with the people in your zip code. Now? Our students can collaborate with musicians across the globe. They can record a track in their bedroom in New Jersey and have a cellist in London add a part to it by the time they wake up the next morning.
    This digital connectivity breaks down the walls of the practice room. It makes music a social, global experience. That is the world our students live in, and we want them to thrive.

    Join the Movement

    The Third Wave isn’t about replacing the First or Second Waves. We still need the beauty of the acoustic sound and the freedom of eclectic styles. By adding the digital layer, we complete the picture. We enable musicians who are versatile, tech-literate, and deeply engaged in music throughout their lives.

    If you’re feeling inspired (or even just a little bit curious), come hang out with us. Whether you’re looking for workshops or want to join our Electric Violin Labs Studio, we’re here to help you navigate the gear, the software, and the pedagogy.

    Keep playing, keep exploring, and I’ll see you in the Lab. Jess

    Want to dive deeper? Check out our about page to see the mission behind the music, or contact us directly if you have questions about bringing the Third Wave to your school!.